Zapier Webflow vs WordPress: Setting Up an Auto-Publish Zap
Build the same auto-publish Zap for Webflow and WordPress and see which CMS handles drafts, images, slugs, and SEO fields with fewer workarounds.

For teams comparing Webflow vs WordPress automated publishing pipelines, the useful test is one approved article delivered to both destinations. This walkthrough builds two versions of the same Zapier workflow: approval, field validation, draft creation and controlled publication. You will check rich text, images, slugs and SEO metadata before enabling public delivery. The finished result should be one correctly rendered article per destination, with its CMS identifier and publication state recorded against the source.
1. Prepare one article and define a passing result
Start with a spreadsheet containing one hypothetical test article. Use a spreadsheet connector with a trigger for new or updated rows, and keep both destination Zaps disabled during configuration.
Prepare a Webflow collection and a WordPress test destination where you can inspect drafts. Connect accounts authorised to create content and publish it. Confirm that your Zapier plan supports the steps you intend to use.
Use these source columns:
content_id, a permanent identifier for the article.revision, the approved version.approval_status, initially set toreview.title,slugandbody_html.excerpt,meta_titleandmeta_description.image_urlandimage_alt.- Separate CMS ID, delivery state and published URL columns for each destination.
Choose the article template and intent before approving the body. A publishing workflow should receive an agreed structure rather than decide it during delivery.
If SiaSEO supplies the site-aware draft and quality score, retain editorial approval as a separate field. Record which revision received approval.
Define success before connecting the actions: one draft per destination, readable formatting, the intended image, the approved slug and metadata in the rendered page. Publication must produce an accessible public URL.
Inspect the source row before proceeding. Every required field should contain a deliberate value rather than a placeholder.
2. Build the shared approval trigger
Create the first Zap and select the spreadsheet trigger that detects the relevant row change. Load the test row so subsequent mappings use a complete article.
Add a filter that continues only when approval_status equals approved. Require a populated title, slug and body. For this initial creation workflow, also require that the destination’s CMS ID is empty and its delivery state is pending.
These conditions separate editorial readiness from delivery. An approved article with an existing destination ID belongs in an update workflow.
Keep the approved target query alongside the article if your team uses it during review. Resolve questions about long-tail keyword selection before changing the approval field.
Test the filter twice. First submit the row with review; it should stop. Then change it to approved; it should continue. Confirm both outcomes in the test results.
Duplicate this shared setup for the second destination. Change its filter to inspect that destination’s ID and delivery columns. A successful Webflow delivery must not block the WordPress branch.
Connector labels and available fields can differ between account configurations. Inspect the action inputs in your connected account before adopting a mapping. If a required operation is unavailable, record that gap before enabling the Zap.
3. Map the approved article into Webflow
Configure the Webflow version to create a draft or staged collection item first. Keep public publication outside this initial test.
Match the collection schema
Select the destination site and article collection. Map the approved title to the collection’s name input and the approved slug to its slug input.
Map body_html to the collection’s article-body rich text field. Add the excerpt and any other fields your collection requires.
Use a deliberately varied test body: a paragraph, a heading, a linked phrase, a bullet list and an inline image if those belong in your production format. This exposes formatting problems before publication.
Run the creation action once. Inspect the item in Webflow and confirm that each value reached the intended field. If HTML appears as visible tags, stop and resolve the content format.
Connect the image and SEO fields
Inspect the image input’s expected format. If it accepts a publicly accessible image URL, map image_url and inspect the resulting asset. Open the source image while signed out to check accessibility.
If the action expects an uploaded asset or identifier, complete that asset step before creating the item. Map alternative text only through a field that actually controls the image’s alt attribute.
Create or identify collection fields for the SEO title and description. Map the source values, then confirm that the collection template uses those fields for page metadata.
A populated CMS field alone does not establish that the page template reads it. Check the template configuration as well.
Save the destination identifier
Write the returned item ID to the Webflow-specific source column immediately after creation. Set its delivery state to draft_created.
The expected result is one identifiable CMS item. Search the collection by the approved slug and confirm that its ID matches the recorded value before running another creation test.
4. Send the same approved draft to WordPress
Configure the second Zap against the same source article. Use WordPress-specific delivery columns so each destination retains its own result.
Create a draft post
Select the action that creates a post and inspect its available inputs. Map the title, HTML body, excerpt and slug to their corresponding post fields.
Explicitly select draft status for the test. Check the destination site and post type before executing the action.
Where author or taxonomy fields require identifiers, select or resolve the destination records. Do not assume that an author’s display name or a category label will satisfy an ID input.
Run the action once and open the returned post in WordPress. Verify the paragraph structure, heading levels, links and lists in preview.
Record the post ID in the WordPress-specific source column and set its delivery state to draft_created. Confirm that the draft belongs to the intended author and has the intended taxonomy assignments.
Attach the featured image
Inspect the featured-image input before mapping the source URL. If it requires a media identifier, add an available media-upload action first and pass its returned ID to the post action.
Check the uploaded image’s alternative text separately. A successful upload does not establish that alt text was saved.
Open the draft preview and inspect the featured image and inline images independently. They are separate acceptance checks.
Resolve SEO metadata explicitly
Keep the post title and SEO title as separate requirements. Inspect whether the connected action exposes the fields used by your SEO setup.
If those fields are absent, choose a supported integration route that exposes them or keep metadata entry manual. Record the limitation rather than mapping the description into an unrelated field.
Verify the resulting title and description in the rendered page or preview where available. Leave the workflow draft-only until required metadata can be checked.
5. Inspect the rendered drafts against the source
Compare both destination drafts with the approved row before enabling publication. Use the same acceptance checklist so the comparison measures delivery.
Check content and presentation
Read the beginning, middle and end of each draft. Inspect heading hierarchy, paragraph breaks, lists and link destinations. Check any tables, embeds or code blocks that your actual articles require.
Compare the image with the approved asset. Inspect its crop, placement and alternative text. Test the preview at a narrow viewport as well as desktop width.
Confirm that the body has not acquired a second article title where the template already supplies one.
Check URLs and metadata
Inspect the intended slug and any destination-generated variation. If the CMS changes it, identify the cause before treating the URL as final.
Check the page title and meta description in the rendered HTML where available. Also inspect canonical and indexing settings if they form part of your publishing requirements.
If both test destinations will become public, decide which should be indexable before publishing identical content.
For repeated use, a small interactive mapping checklist could track each source field, destination input and verification result. It should flag unresolved metadata or media mappings before approval.
The expected result is a completed check for every required field. Keep any failed destination in draft state and correct its mapping before continuing.
6. Enable publication after the draft checks pass
Treat publication as a separate release step. The next action can make the article publicly accessible. Confirm the destination, approved revision and intended public URL before testing it.
Publish the existing test items
For Webflow, inspect the available action for publishing the created collection item. Supply the stored item identifier and verify that the action targets the intended item.
Keep draft creation and public publication distinguishable in the run history. If your connected action cannot perform the required publication operation, retain draft delivery and document the remaining manual step.
For WordPress, use an available update action to change the existing draft’s status to published. Pass the stored post ID so this test operates on the draft already reviewed.
Open each public URL while signed out. Verify the title, body, image and metadata again. A successful action response is only one check; inspect the public page too.
Configure delivery for future approved articles
Once the test passes, add the publication step after draft creation and ID recording in each workflow. Keep the ID write before publication so a later failure leaves a destination record to reconcile.
Record the final delivery state and actual public URL after successful publication.
Run a fresh hypothetical article through each enabled workflow. Confirm that approval starts delivery, one item is created and the final URL opens publicly.
Finally, update a delivery-log field on that source row. The creation filter should stop the resulting trigger because the destination ID already exists.
7. Reconcile partial failures before replaying a run
Inspect the destination whenever a Zap fails after a creation attempt. The item may already exist even if a later logging or publication step failed.
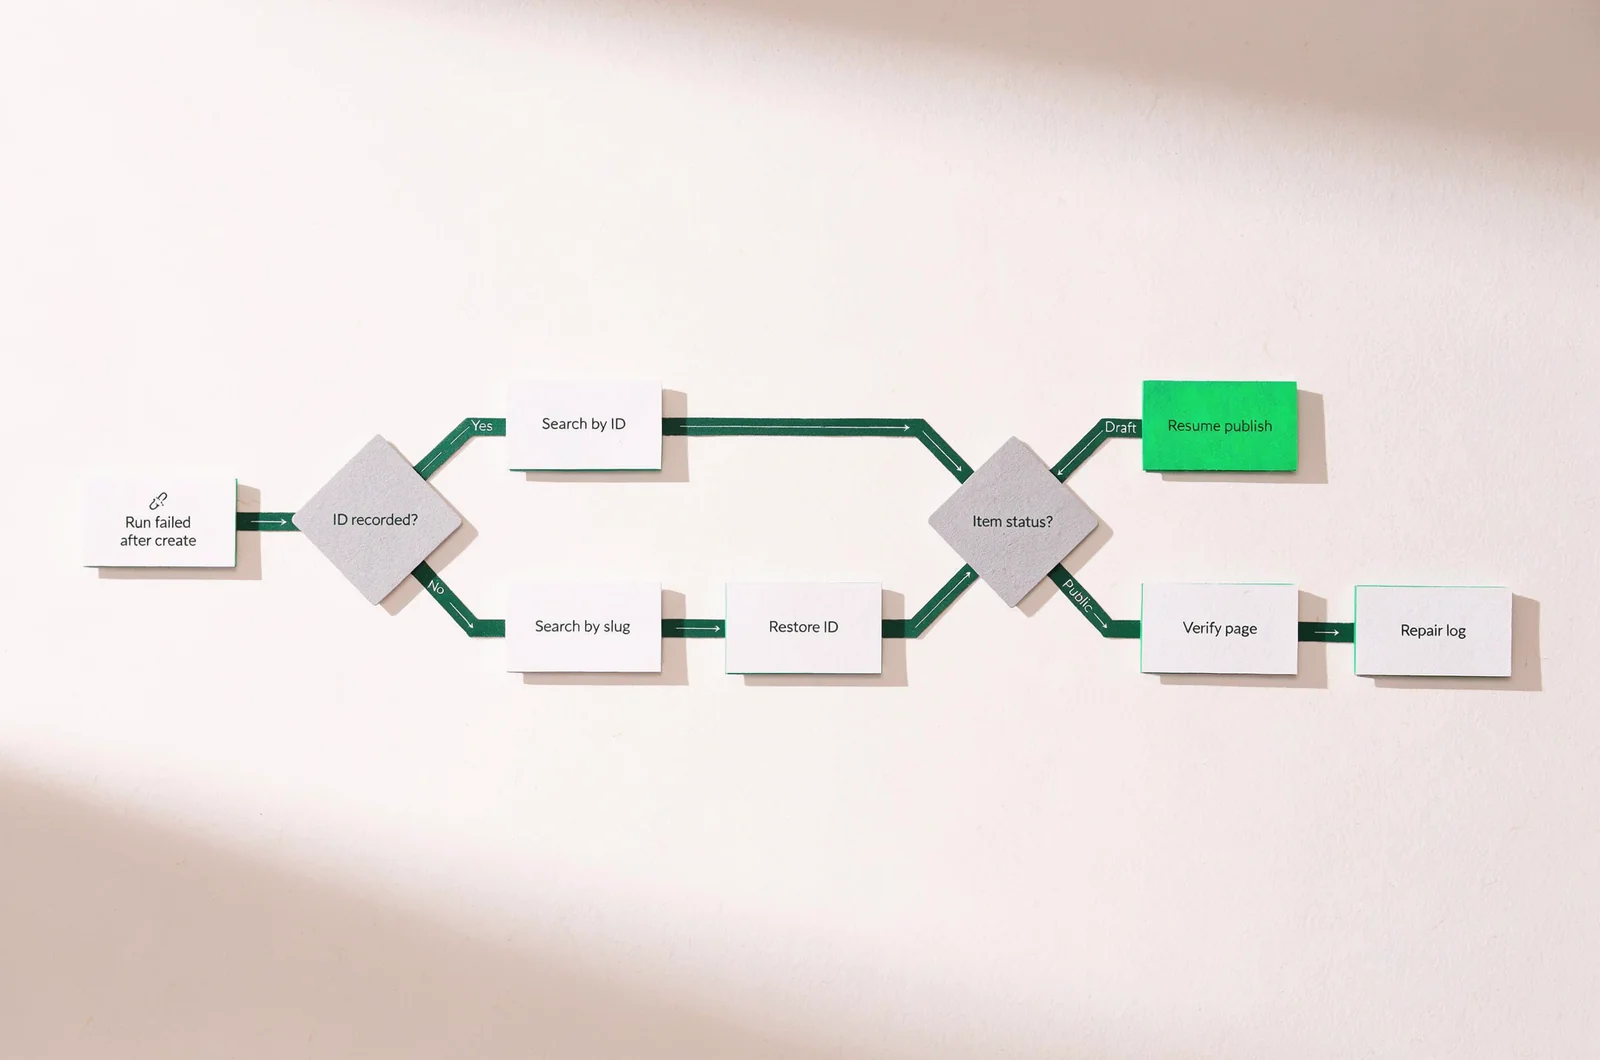
Search by the recorded ID first. If no ID was saved, search by the approved slug and compare the article title and content. Restore the missing identifier before resuming delivery.
If the item exists as a draft, resume publication against that item where the available recovery controls permit it. If it is already public, verify the page and repair the source log.
An empty-ID filter reduces repeat creation after the identifier has been saved. It cannot prevent every duplicate when creation succeeds but the subsequent write fails.
Avoid simultaneous runs for the same article and destination. For higher-volume operations, introduce a processing state or queue with explicit ownership of each delivery.
Assign responsibility for failed runs and record the failed operation, destination ID and source revision. A log entry that says only error leaves too much to reconstruct.
Test recovery with a controlled failure before relying on unattended publishing. Keep the creation step disabled during recovery whenever an existing item has been confirmed.
Questions that affect the Zap design
Webflow and WordPress should pass the same acceptance checks, but their connected actions may require different delivery steps.
Can one Zap publish to both destinations?
Use separate destination paths only if your Zapier configuration supports the required branching and logging. Two Zaps make the initial lab easier to inspect because each destination has its own run history.
Keep approval data shared and delivery results separate whichever structure you choose.
Which CMS needs fewer workarounds?
Count the unresolved steps in your own configuration: asset upload, taxonomy resolution, SEO-field access and publication. Prefer the route that satisfies your required fields with fewer manual interventions.
Do not treat successful body delivery as proof that images, metadata and publication state are complete.
When should direct CMS publishing replace the Zaps?
Consider direct publishing when maintaining mappings, approval rules and recovery steps consumes more effort than your team can support.
SiaSEO combines site-aware drafting, quality scoring and direct CMS publishing. Evaluate that route against the same checks used here: approved revision, mapped metadata, rendered images, destination ID and a verified public URL.